Consent Management Restrictions Scenario
Since GDPR rolled out in the first half of 2018, there have been multiple technology changes to both the consent management and tag management landscape. With CCPA going into effect on July 1st, I want to share the common approach I use to apply consent management restrictions to various technologies and tags within Adobe Launch. Your scenario may be different, so this is intended as a general guideline. Where I have found I need to make additional modifications, I’ll include links to helpful documentation.
Before we get into the technical details, let’s outline the “default” scenario and assumptions:
- The client either already uses or has chosen to use OneTrust as their consent management platform.
- The client and OneTrust have worked through an initial site scan and identified all the cookies being set, as well as what vendors/technologies are setting each cookie.
- The client and their legal team have classified each cookie into the appropriate “bucket” of Functional, Performance, or Advertising, and they’ve seen to other legal items like updating the privacy policy.
- The client uses Adobe Experience Cloud ID Service, Adobe Target, and Adobe Analytics. Of these, all have been classified as Performance. (Please note: as you are working through the classification process, make sure to consult your legal team to determine your organization’s classifications. I am just using “Performance” here as an example.
- We want to err on the side of caution for tracking users. If we are unsure if a user has consented, we won’t send any tracking through Launch until we are certain of consent.
Now that we’ve outlined the scenario, let’s cover the different components.
1. Deploying OneTrust – The ideal approach is to have OneTrust embedded directly into the source code of the page, as high in the <head> as possible. The reason for this is OneTrust needs to do various lookups, such as a geo lookup for the user to determine if they reside within various areas of restriction, e.g., the EU for GDPR or California for CCPA. We want to give this script as much time as possible to complete prior to evaluating conditions in Launch, because we want to leave the tracking flow for users with implicit consent as close to normal as possible. Deploying Launch asynchronously can also help avoid race conditions, but since we have no guarantee the OneTrust script will fully load and execute prior to Launch starting its evaluations, we’ll add some more safeguards with the Adobe Opt-in service later on.
If not directly loading OneTrust from the source code, the alternative is to add it via Launch. To set yourself up for success with this approach, a rule with the event type of Custom Code is your best bet. This event type is new to Launch over DTM, and it allows you to load code prior to the Page Top event. This will get OneTrust starting to load as soon as the Launch library is loaded. I have used this method several times, and it does work well with the Opt-in service modifications we’ll cover below.
2. Create Data Elements – A feature OneTrust provides for Launch users is an extension for each consent classification. This can be useful if you have a pretty basic implementation through Launch. However, by using a few custom Data Elements instead of the extension, you can be better suited for various implementation architectures and set up for the future without too much effort. I’ll cover what data elements I create and why.
Classification level data elements:
- For each classification, I create a data element specific to that consent category. You can either have your data element read the OptanonConsent cookie for the appropriate classification, or for more recent implementations there is a global variable that I like to use: OnetrustActiveGroups. This variable returns a string of all the classifications to which the user has consented and will look like, “C0001,C0002,C0003,C0004,” if full consent is provided. (As an aside, I’m not sure when OneTrust started making the OnetrustActiveGroups variable part of their library, but I do know not all OneTrust implementations create this variable, so please check what you have access to before you start the process.)For example, if I were creating a Performance Allowed classification data element I would use the following code:

- For each technology or tracking vendor, I create a data element specific to that vendor. It should reference the classification bucket data element decided on for the vendor, and then check the data element to see whether or not that classification has consent.I recommend using this approach because if a technology needs to change classification buckets, or if stricter regulation is enacted, this should set you up for minimal changes, compared to directly referencing the classification bucket in each rule. The last thing you want to do is go back and update a couple hundred rules in Launch to change something from Functional to Performance. . . not that I’m speaking from experience.
- One exception I may make to this approach is with advertising vendors that you can confidently assume will always be classified as advertising, such as DoubleClick or Facebook pixels. Using one “Advertising” bucket can make it easier to update your rules if your rules have a mix of vendor-specific extensions and custom code in the Actions section.
- Here’s an example “Analytics Allowed” data element that references the Performance Allowed data element from above. If Adobe Analytics were ever moved from Performance to Functional, only this data element would need to be updated:

3. Update Your Rules - When updating rules I use one of two approaches.
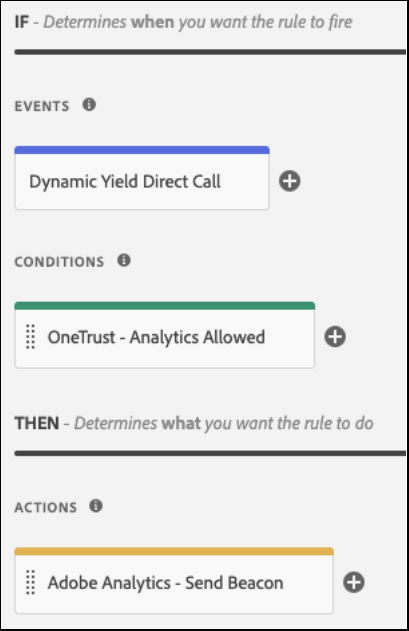
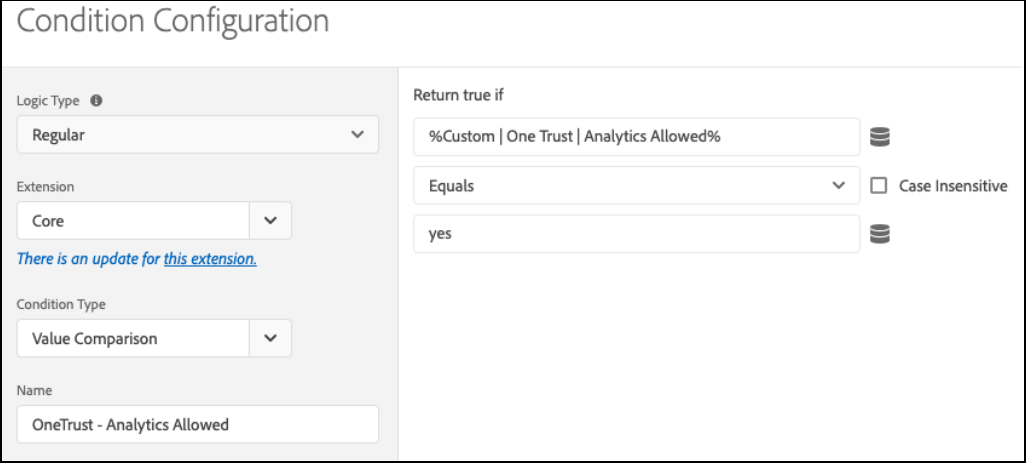
- The easiest, most straightforward way is to add a Value Comparison condition. This approach works best if you only have one technology used per rule. I typically separate Adobe Analytics from other third party tracking because I'm cautious to have non-production-ready code published when making third party tag changes, and keeping Adobe Analytics in it’s own rule set gives me that peace of mind.
- A simple Value Comparison method example:

- Set up of the Value Comparison condition configuration:

- The more complex method is to wrap any custom code used in rule conditions or third party tag code in the appropriate technology/vendor-specific data element. I use this most frequently if I have any logic that stores any values to cookies, local, or session storage in the custom condition section, or for wrapping third party tags in the actions section of a rule. Here's an example for wrapping custom code in a custom condition for Adobe Analytics:

4. Update Your Adobe Extensions – There is one more set of updates I make. Where you make the update will depend on if you’re using the Experience Cloud ID Service extension or not.
If using the Experience Cloud ID Service extension, you’ll want to leverage the Opt-in Service that is provided. If you’re unfamiliar with the Opt-in Service, you can read more about it here. For our scenario, I’m assuming the Experience Cloud ID Service, Adobe Target, and Adobe Analytics are all sharing the same consent classification. If you have additional Adobe services, such as Audience Manager, or if the tools listed are not all considered to be in the same consent classification by your organization, you’ll want to look more into Adobe's opt-in categories and workflows.
When using the Opt-in Service, I like to create a data element for whether or not Adobe’s tools are allowed to load within Launch. This data element is typically a copy of the Analytics Allowed data element we covered earlier, just with a different name so that we can change it later if needed and not worry about affecting rules elsewhere.
An example Adobe Opt-in data element code where Adobe tools all use Performance classification:

If this data element returns true, then the Opt-in Service will stop the Adobe tools from initializing in Launch. This will ensure that no visitor lookups or other code that could potentially track a user in Adobe will run unless a.) the user has consented to Performance items prior to the current page, or b.) we tell Adobe tools to execute, once a user consents on their current page.
I can achieve the desired result by enabling Opt-in and setting the data element like so:

Now to tell Adobe tools they can load in the scenario, a user changes their consent classification post initial page load to allow Performance items. We can create a rule that listens to changes to the Performance Allowed data element and then uses the Opt-in workflow to approve and run each Adobe tool. Again, our scenario is rather simple, with all Adobe tools being considered in the same consent classification, but to learn more about the Opt-in workflows, you can read Adobe's documentation.
An example custom condition custom code for the rule that listens to changes to the Custom | One Trust | Performance Allowed data element:

An alternative to using the data element changed condition is to use the optanonWrapper function that is a component of OneTrust. This function should get executed every time a user's consent is updated. To learn more about this function and how to work it into your implementation, reach out to your OneTrust representative.
Once you've completed these Opt-in Service changes, you should be ready to build your dev library and start testing.
If you are not currently using the Experience Cloud ID Service, and I do recommend you use the extension, I would add some code to doPlugins to force Adobe Analytics to not send a beacon unless the proper consent classification is active for the user. Within doPlugins in the Adobe Analytics extension, it would look like:

The above code does 3 things:
- The s.t and s.tl functions are cleared out so that if there is any code hardcoded on the site to send an Adobe Analytics beacon, that function will no longer work until a page has been loaded where a user has consented. This can be seen as a bit heavy-handed, but with so many unknowns, I like to make sure there aren’t rogue server calls being sent or cookies getting dropped that could get a client in legal trouble.
- The current beacon has the abort flag set so it is not sent.
- I return false so the code execution doesn’t go any further into doPlugins. This is especially useful for typical plugins like getPreviousValue, which store a cookie as a result of executing.
Conclusion
Stricter regulation on what and when data can be sent is here to stay. Considering the current climate around what large tech companies do with user’s data and how well they protect it, I expect to see the scope of regulations increased across the U.S. and abroad. Adding a forward-thinking, standard approach to how your tracking will accommodate these changes is an important component to your implementation architecture. Hopefully, this post has given some clarity to what approach to use or at least provided some things to consider for future-proofing any existing implementations.


.png)

